life style

Kailash Travel Diary (Guest Post)

I am back with an exciting guest post written by @nena khan, she is not only my bestie but also a wife and a mother of three beautiful kids. I always wanted to travel Northern Areas in Pakistan and loved hearing stories about their simple and hard-working lifestyle.she recently visited Kailash Chitral, and I asked her to write a blog post to summarize her trip. Hope you will enjoy her trip as much I do.

I am from Pakistan and have got many opportunities in my life to travel through many areas of Pakistan and meet different people from all strata of society. I have seen almost all places of my country and lastly, I visited Bumburet Valley of Chitral.

It was a quite different and beautiful experience of life. There, I came across very amazing facts and history of Kailash Valley which is very rich in culture and traditions. The culture is very different from other parts of Pakistan. Their religion name is Kailash and the place is also named on religion. The three tribes and valleys of Kailash people i.e. valleys of “Rumbur and Bumburet” forming one, and Birir valley the other is known as “Kafiristan”. Kailash people are very simple, honest and peace-loving by nature.


43030776_10156395153755791_3620223673190842368_nThey have a very simple lifestyle and don’t have vast ambitions in life as we do. They don’t spend much money on clothes, food and houses. Most of the people are very poor as they have to spend a lot on festivals and local traditions. They are supposed to celebrate the funeral and slaughter fifty goats to feed the entire community and serve them wine after as well. They sing traditional songs of mourning and ladies wear their traditional dress for the funeral ceremony.  In ancient times, people used to place their dead bodies open in a traditionally prepared Coffin at graveyard but since 200 yrs, they started burying dead bodies with coffins and place dead person Charpai (Jute-bed) ups and down over his grave.

As per local customs, the rich person makes the statue of his dead father or relative and in this way, a family expend five to thirty-five lac on after death events and customs. But now the new generation has gone against this tradition and desire to discontinue such traditions as these make them poorer but elders still insist to follow these centuries’ old customs and traditions which differentiate them from other tribes and people.

42917002_10156395153670791_8050548242208784384_n Kalish marriages are also very different, the groom chooses his bride during a traditional dance party. The lady’s father or brother come to the male house and demands money which the boy provides them and marriage is done. Moreover, any male can even take along any already married woman to his house but has to provide a double amount of expenditure done on previous marriage to her first husband.

42914351_10156395153480791_8090197258571612160_nThe people of Kailash live longer than average and their life expectancy is 80 to 90 years. Recently, a man died at the age of 125 years. The reason for long life is their pure and simple food, which also include local dry fruits and goat meat. The people of Kailash think that women are impure and due to same reason women are not allowed to drink water with the same glass of water or even touch. Similarly, during their monthly menstrual days and delivery of a child, they spend these days in a separate isolated house where their family members provide them with food and other daily use things.

 I would like to say thanks to my blessed nest who encouraged and supported me to write a blog as a guest post.

Home Decor / DIY

DIY Body Pillow

Let’s do a little DIY that doesn’t break your bank, and looks so elegant. I made this body pillow from a rug I got from the clearance section from Home sense and made it under $10.

20180830_164840

I hand stitched it and super easy to make, need some basic sewing skills and voila, It make your bed more comfortable, cozy and complete.

you will need!

20180808_145128.jpg

  • Any soft rug
  • upholstery cotton thread
  • Heavy duty needle
  • Cotton Filling

20180831_121836

I made this draft to explain to you, follow the dotted line and use the cross stitch method or whatever you like with a heavy-duty needle and thick embroidery thread.

42325014_10156369803945791_8174429134978547712_n
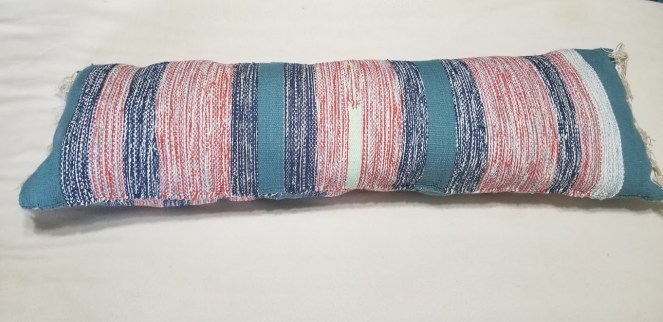
Fold the rug in half and stitch all the three side and leave one side a bit open to fill the cotton filling. You can use a sewing machine but I preferred hand stitching.

20180831_121852

Its super easy and took only a couple of hours to make it, so if you find a cheap rug grab it quickly! You can check A DIY Lumber Pillow I made earlier.


Food & Recipes

Hara Masala Chicken

Green/ Hara Masala chicken is one of the famous Pakistani dishes. It’s very easy and delicious recipe that doesn’t take much time.

20180913_192520

Ingredients:

Chicken:1/2 kg

Yogurt:1/2 cup

Onion:1 sliced

Whole Peppercorn:4-5

Red chilli powder: (acc to taste..I have Extra Hot) 1/4 Tsp

Turmeric powder:1/2 tsp

Coriander powder:1 Tsp

Paprika powder:1 Tsp

Salt: To Taste

Oil:1/4 cup

For Green Masala:

Cilantro/Green Coriander: 1/2 Bunch.

Green Chillies: 5-6

Tomatoes: 2 chopped

Ginger:1/2 inch piece

Garlic:3-4 Cloves

RECIPE:

41700013_10156355762105791_1422440649575104512_n

  • Coarsely grind/blend all green masala ingredients, set aside.
  • Heat oil, fry onion till light golden brown, add whole black pepper.
  • Fry chicken, until it changes colour.
  • Add all dry masala, and saute it for 5 minutes.
  • Now add the Green Masala paste and saute chicken for 10 minutes.
  • Add yogurt and let the chicken cook till it tender, Add required water to make desired gravy.
  • Cover the pan for 10 minutes on low flame until oil separates.
  • Garnish with green chillies and cilantro

Serve hot with chapati, roti or rice. Enjoy!!


life style

Diary Post

Disclaimer: I am not an expert,  just sharing some tips to help you to get your stress out. Please get professional help as soon as possible if things are getting worst.

Its hard for me to get the courage to talk about social issues that we all are facing or at least somehow to become part of this negativity and my BFF suggested me to start writing about some issues ( that are not only affecting us but created by us too) who knows somebody somewhere needs it and hopefully gets benefited.

41262322_10156340715240791_3877449947448082432_nI am completely heartbroken, a couple of young ladies recently got affected by such negativity and commit suicide. Life is a beautiful journey but it has some ugly chapters and one has to read the whole book but without reading it to “The End” how come you can give up in the middle?.

I have been gone through some tough phase of life, like you, like EVERYBODY.. but I always try to look forward and count my blessing every single day, my positive attitude always motivates me to get rid of any negative thoughts and helps me to move on.

41172696_10156340715145791_4387799818647371776_n

Here are some of my personal notes that I always love to follow and try to get rid of negative thoughts, anxiety and stress to feel better.

  • Think positive and count your blessing, to get rid of the negative thoughts that affecting somehow.
  • Try to stay away from all sort of negativity, drama or anything that is affecting you, distance is always better.
  • It’s OK to be NOT ok...one can’t smile or happy all the time. Cry if you want to.
  • Do not compare your life with anyone, NEVER…the best thing You can do for you live the life you love.
  • Saying NO doesn’t make you a bad person.if you can’t do it, say NO ( it was one of the toughest things for me to do and I’m still working on it).
  • Sometimes it’s your illusions that are so negative that make the situation negative. There are always some better options, try to find one.
  • Don’t do any race with anyone, it could be status race, brand race or could be any, keep yourself away from such people and don’t be one of them.
  • Expect less from other people as much as you can, you will hurt less.
  • It’s not necessary to give an explanation or ask for an explanation if something happened unexpectedly. Just let it go!!
    41309107_10156340715465791_1421866622901026816_n
  • Find a hobby or an activity (activities) that you love to do, it could be anything that you enjoy other than your routine house chores.
  • Talk to your mom, friend or sister/spouse, the one who can listen to you or at least cheer you up.
  • Go for a walk, window shopping or listen/watch you like. Take a time out just for yourself or the person you like.
  • Love whatever you have, your skin colour, your body shape also countless other blessings that we used to take for granted.
  • Talk to nature, do gardening or even try to catch a butterfly like me.
  • Don’t judge the book by the cover, everyone is unique. It’s your vision how you look at.
  • Go with the flow, it always surprises the way you never expect.

Life is beautiful, don’t give up just because you treated yourself like that. You are the most important person you know for yourself first, and for your kids, for your parents, spouse or your friends.

Try to get out of it by yourself, if not, ask for help.

Mental Health Line Canada:1866-531-2600


Food & Recipes

Paneer Karhai

I am back on blog after a break and sharing a simple paneer karhai that actually my elder sister’s recipe and it is so easy to make and can be served as a side dish if you have dawat.Less spices and less effort but so YUMMY!!

40295212_10156317715385791_6932597478017466368_n

Ingredients:

Paneer: 1 packet (I used Nanak Paneer).

Onion:sliced 1-2 medium

Tomatoes:2-3 chopped

Red Chilli Flakes:1-2 tsp

Salt:To taste

Turmeric Powder:1/2 tsp

Kasuri Methi:1 tsp

40194958_10156317715490791_975341262800420864_n-e1535431500503.jpg

Method:

Cut Paneer into 1/2 inch cubes,fry them all sides to light golden , keep aside.

Heat oil and saute onion to light golden brown,add tomatoes and cook until it become smooth paste.Add chilli flakes ,turmeric powder and salt.Cook till it separates the oil.

Mix fried paneer pieces with masala and add little water and cook for few minutes.

Sprinkle Kasuri methi(dried Fenugreek leaves) and leave it for 15 minutes on low heat.

Serve hot with Naan or chapati.Enjoy!!


Home Decor / DIY

DIY Kid’s Teepee

20180802_142343

Making a tent out of sofa cushions is one of the favourite things to do when my kids home. I often made a temporary tent with a sheet and pair of chair and Bilal loved spending hours inside. When I saw some DIY tents and Teepee tutorials on Pinterest and YouTube, I thought I should give a try just because I knew that whatever come after he will play inside happily.

20180802_143743

A not-so-perfect teepee but it’s surely a worth sharing project with you guys. I posted some stories on my Instagram while I was making it so let’s have a look my not-so-perfect Teepee(I will surely give another try but it’s literally a pain in a bum and a time taking project). Lots of stitching and measurement required with some sewing skills.

20180802_142444

I will share tutorial later just because I can’t keep you guys waiting, who asked me about the project follow-up plus I was so excited to show you guys the end result. Isn’t it cute?

20180802_143701.jpg

This is an outdoor/indoor TeePee/Tent and portable but does need little bit assembling every time I move. I put some blankets and cushion to make it more cozy and comfy.

20180802_145029

Not only my little one but the two elder kids love to hang out for hours too. I also add some battery operated LED light string and some DIY banner and garland (feather).

20180802_143800

I tried my best to take some decent pictures with a super excited kid. I need some paperwork before I post a tutorial so if you have any queries just let me know.

Food & Recipes

Italian Garden Salad

Salads are the mandatory in any cuisine or Dawat ,I love-making salad and often try with different homemade dressings.Garden Salad is one of the easy and healthy recipe especially when we do our BBQ and picnics during summer.20180721_130426

Today,Let’s make a healthy garden salad with homemade Italian dressing. All you need to do is,chop all vegetables and before serving, just toss everything with dressing. Truly, this is the best and easy chopped  Italian salad recipe I have ever made, with fresh and green vegetables in the homemade vinaigrette.

Ingredients:

Ice Burg Lattice/Cabbage: 1 Bunch

Broccoli:1 Bunch

Cucumber:1 Large

Green/Red /Yellow Pepper:1 each

Carrots:1-2 Julienne cut

Red kidney bean(boiled):1 can

Cherry Tomatoes:10-12 cut in halves

Olives:sliced

Red Onion:1/2 chopped

Corn:1/2 cup

Baby Turnips:7-8

20180721_130426

Dressing:

Olive oil:3 Tbs

Lemon juice:1 Tbs

White Vinegar:1/4 cup

Salt and Pepper: To Taste.

Mustard Paste:1/2 Tsp

Dried Herbs: Oregano & Basil: 1 Pinch each

20180715_103125

Mix all ingredients in a glass bottle shake and toss your salad and serve.You can add vegetables of your choice and of course availability.Check out Cold Pasta Salad and enjoy your summer.


life style · Mid Week Fave!

Mid Week Faves!!

Getting candles in the mail is a joy forever, for me yes it is. If you know me(or even not) send some flowers and candles and you know what…You dont need to ask me..I will love you more!!

Diana from ” Joyful Home” sent me some soy candles and I loved them all.20180707_211804

These soy candles are 100 % soy wax which is eco-friendly and free from harmful toxins. I never tried soy candles before and it is safe for everyone(Kids/Pets). I loved the smell and it works really well to absorb any strong cooking smell(desi cooking you know).

20180707_211637

If you have a big space these candles especially “Muskoka S’Mores” and “Maple Syrup” are strong enough to fill the space up quickly with an aroma.

20180707_211713.jpg
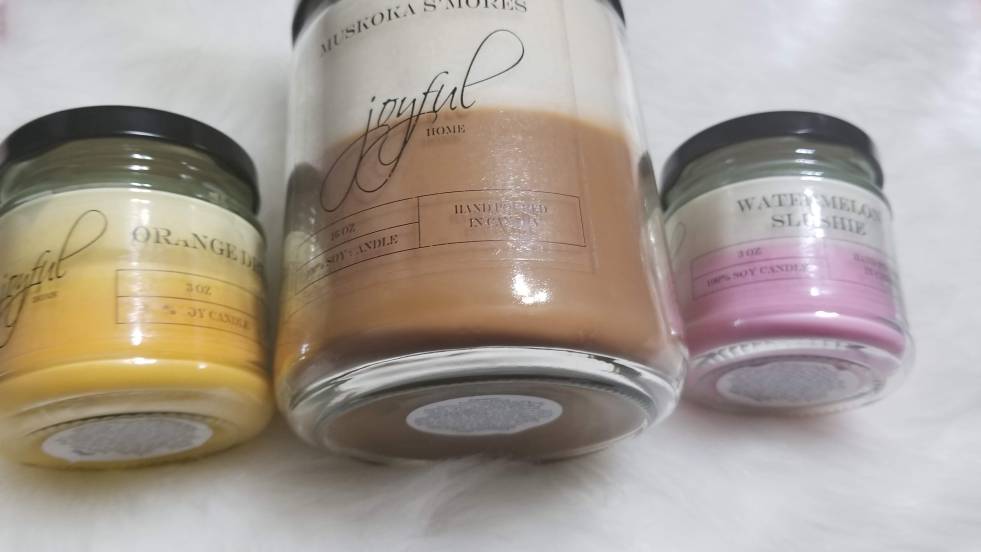
“Water Melon Slushie” and “Bubblegum” are Mild and soft /fruity smell, that lift your mood up. She sent me some small samples of wax melt and can’t wait to try them all.20180708_221557

These hand-poured candles are something you can buy for yourself or for your friend or can buy as a gift for your co-worker or even stock them up for holiday or eid gifts. You can use the discount code “JOY25” for 25% off on any purchase at joyfulhome on her Esty shop.

p.s: A giveaway is on its way💖!!

Home Decor / DIY

Green Lamps Make Over

Thank You So much, Everyone!!… I didn’t know I will get so many compliments and kind words on my yesterday’s post Here.

36941125_10156206592435791_3872775747424747520_n
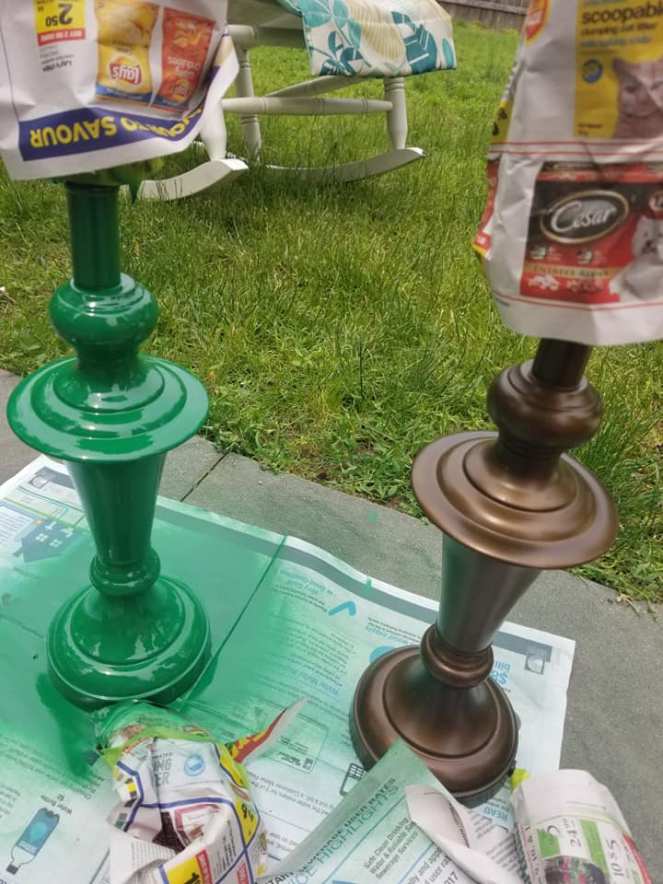
As I promised I am here to share a fun makeover (sooner is better for me). I scored these lamp base from online bidding site and if I am not wrong, I paid just $10 for the set(Not Bad At All ).

37028739_10156209770845791_2605336430293024768_n

I put my bid just because I loved the shape but unexpectedly the condition of the lamps was good. I  liked the bronze colour but didn’t match with my decor at all. I wanted to do a fun makeover that instantly pop up the space.

37102559_10156208669345791_129714884286873600_nThis is the only before picture I have, it had little rust on the lower part but overall it was in great shape. I wanted a quick makeover and spray paint works great especially on metal but let me share some basic tips before paint any piece.

  • Clean  (wood/metal) with wipes or glass cleaners, remove all dirt and grime.
  • Lightly sand with fine grade sandpaper.
  • Wipe off again.

37069503_10156208669415791_6849709599956664320_n

I love spray paint because it gives instant results. I used Rust-oleum Painter’s Touch in “Meadow Green” in the gloss finish. It has primer so I didn’t use any primer before starting to use spray paint. Always try to use spray paint in the well-ventilated area, cover the area with old papers or sheet. Tape the cord and lamp kit (the area you don’t want to paint)with painter tape and paper.

37102559_10156208669345791_129714884286873600_n

Shake well the paint can and hold it and start painting from 10 cm away from the surface. It will give maximum coverage if you use too close it will give paint drips. Wait between each coat and give multiple coats as needed. I  waited at least 2 hours between the coats and gave three coat and left overnight after a final coat.

37059043_10156209770800791_1563257543285800960_n

I love spray paint and it perfect for someone Be-sabra like me who wants instant results. I always use spray paint for small projects, especially on metals. It gives a smooth shiny coverage since it has a gloss finish.


37121538_10156209770770791_4421234700232687616_nI love the final look after I turn them on. The shades are also scored from the Wal-Mart Clearance section and marked down 50%. Yes, many of you asked me how did I get such cool piece for few bucks, will share my Budget/ Thrifty scores and tips soon….It is an addiction and I am literally addicted!!


Home Decor / DIY · life style

Pottery Barn Inspired Mirror (DIY)

36929122_10156205303745791_3604749880980930560_nSome of you probably know I am a DIY addicted. I get inspired by taking window shopping(without kids obviously) around home decor stores like Pier 1 Imports, Home Sense and Pottery Barn, but their price tags sometimes give me a mini heart attack.

screenshot_20180711-123522_chrome

I just love these “Eagan Multipanel Mirrors “available at PB website but their price range is $400 -$ 1000+, depending on the size and style. I would never ever pay this much for a mirror(even won’t accept it as a gift) that only for decor purpose. I know people buy such things at this super expensive price-tag and I don’t have any issues (with other people) but when I can make a similar version(not exactly obviously)which make me happier then why would I  be breaking my bank?

(SO sorry for bad pictures just because I made this last year and captured all pictures from my Tablet).

20170516_120924.jpg

This is one of the projects that I loved more than original inspiration after it is done. I spent around $50 for this DIY.

BaseBoard: I got from Home Depot

Bevelled Mirror/Candle Plates: 25-30 (depending upon size) I bought from Dollar Store, You can find similar at Any craft store or Walmart.

Industrial Grade adhesive: I prefer E-6000 over Gorilla glue.

Cut the baseboard  the desired size i.e 20*25, I measure the size by putting mirrors on the base and trim the excess wood off. I put four mirrors on each horizontal row and set mirrors in five vertical rows.

36943080_10156205303490791_2708281741201637376_n(1)

Use E-6000 on the back of each mirror and carefully glued it to the base. Leave it overnight put some weight ( but not very heavy that breaks the mirror), I used the mild weight like plant pots, some wooden light-weight items

37062146_10156205303375791_432167829890924544_nIf you like you can use the back of any large frame but make sure the baseboard/frame has to be thick enough to hold the weight of mirrors. (You just need to be sure what are you using since mirror has weight but on other hand, are delicate to handle, can be broken easily.)

screenshot_20180712-005643_gallery

Isn’t it so easy? I put this beauty on my server which stores all my dinnerware and dishes. I will make another one soon for my basement (needs a makeover) but a different version for sure.

36941125_10156206592435791_3872775747424747520_n

You can either hang on the wall or even use it like me, it is beautiful, isn’t it? I got so many compliments from my guests. I even stained this second-hand MCM server/buffet (I love this piece of furniture) and painted these cool green lamps, both are garage sale/online auctions finds. Want to know the detail of this makeover??

36929122_10156205303745791_3604749880980930560_nIf I tell you that everything on this server is either I painted or my thrift/garage sale find. don’t ask me the price, it will give you a real shock..lol…want to know more just let me know…;-)